Node Editor
Node Overview
Nodes are customizable blocks of code that execute a single task within a flow. Selecting a node provides template code for defining and testing pipeline logic.
On the Flow Editor page, nodes are rendered as a box with a header that contains the node name. The node name can be edited by clicking on the header.
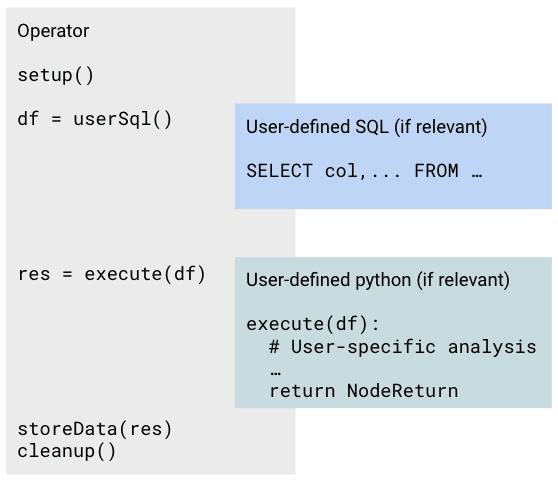
The image above shows how nodes are represented on the Flow Editor page; each node consists of:
- Node Name: located in the header of the node; CSV_Read in the image above.
- Terminal Icon: if present, the is a button that opens the user-editable notebook when clicked.
- Node Attribute(s): if present, the attributes associated with the node that are processed by the node. In the image above, the node attributes 'csv' and 'results' have values '.csv' and 'example_results' respectively.
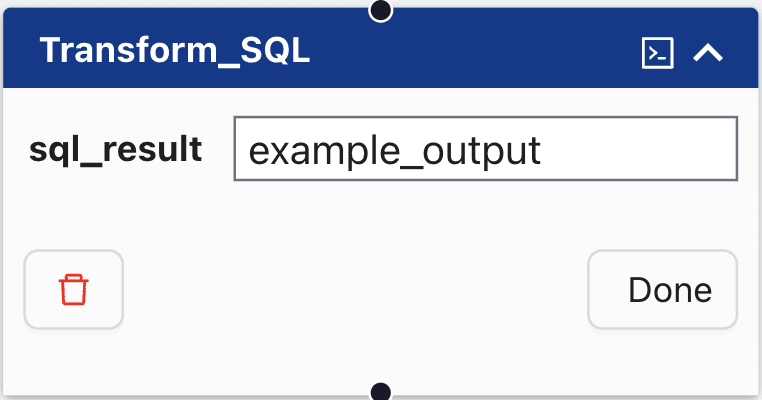
By default, nodes are shown closed. Clicking on the chevron in the upper right hand corner of the node opens the node to display the node attributes.
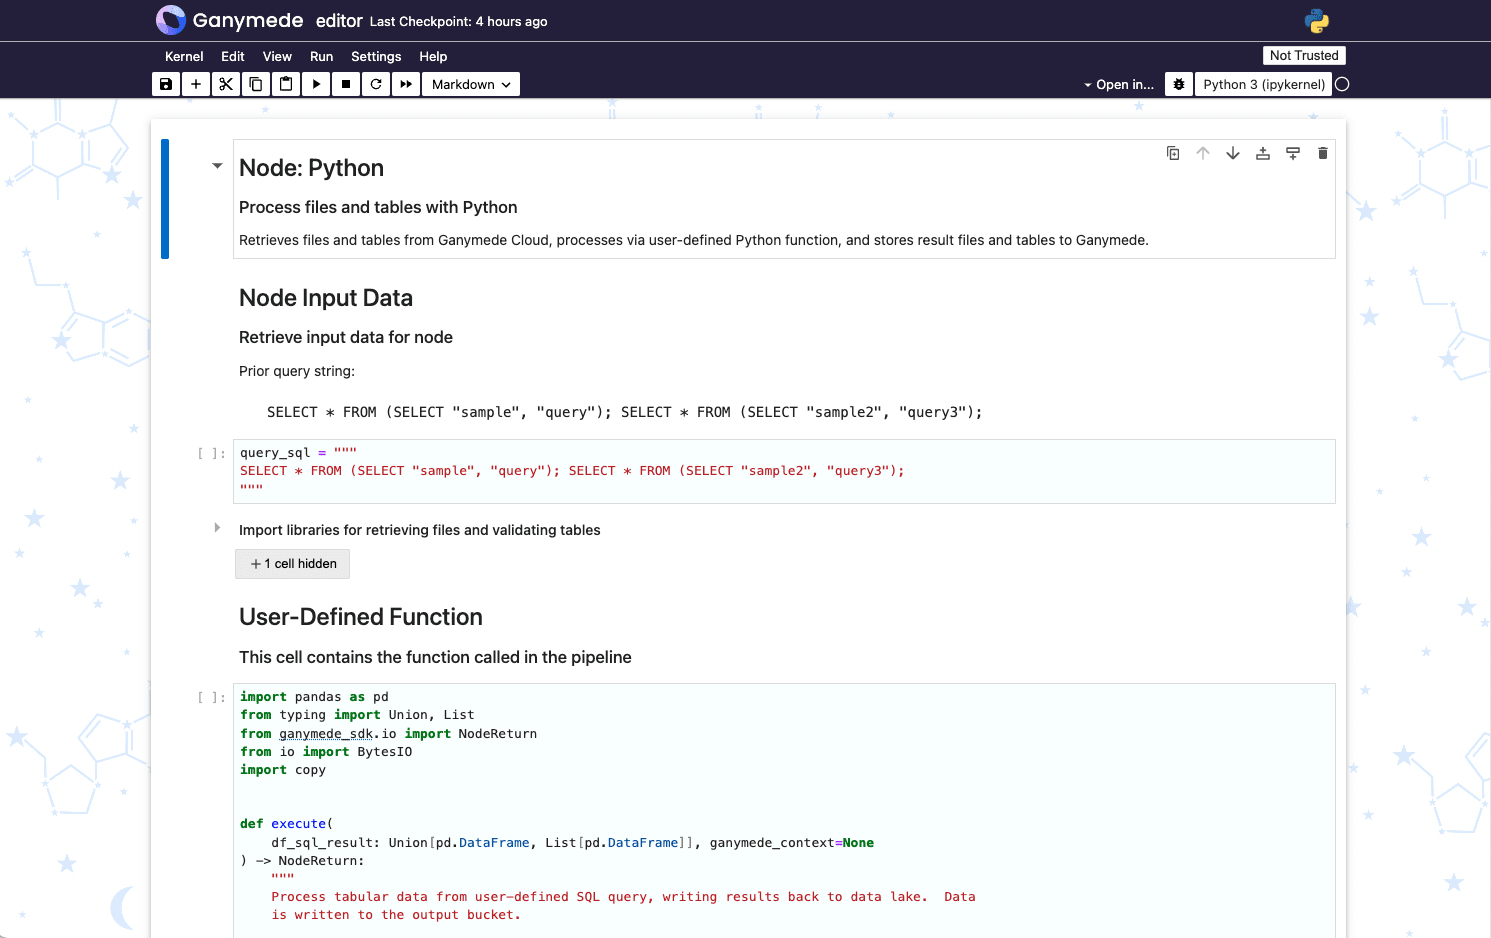
For nodes with editable components, notebooks follow a common structure.
Cells that are saved upon running Save Commit and Deploy:
- User-defined SQL for retrieving tabular data to be processed by the node. This code is executed by the workflow management system.
- User-defined Python for processing input. This code is executed by the workflow management system.
These cells have a light blue background.
Cells that are discarded upon notebook close:
- Testing Section for testing changes to user-defined SQL and Python
Cells in this section have a light gray background.
The Testing section enables users to test changes to the user-defined SQL and Python prior to committing and deploying code.
A full listing of available nodes and their key characteristics can be found on the Node Overview page.
Backing Notebooks
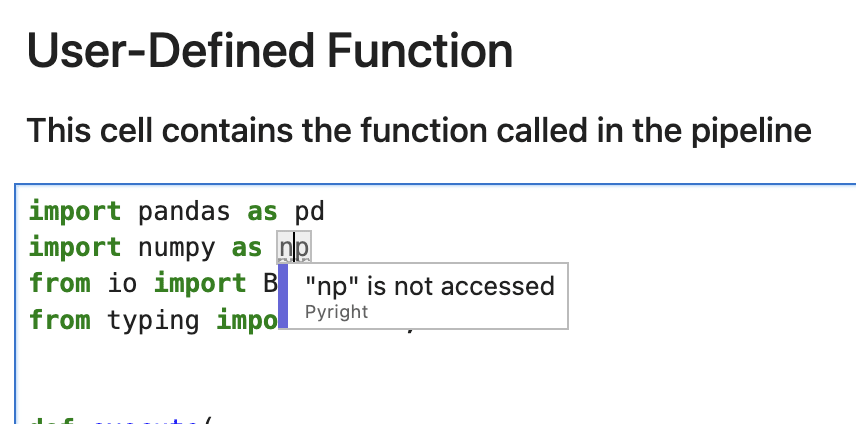
Editable nodes contain a terminal icon () in their upper right hand corner that opens up the notebook backing the node upon button click. These notebooks format code upon cell execution using black, and perform type checking, hinting, and code diagnostics using Jupyter LSP configured with a linter.
Hover over an underlined piece of code to see warnings and errors from the LSP:
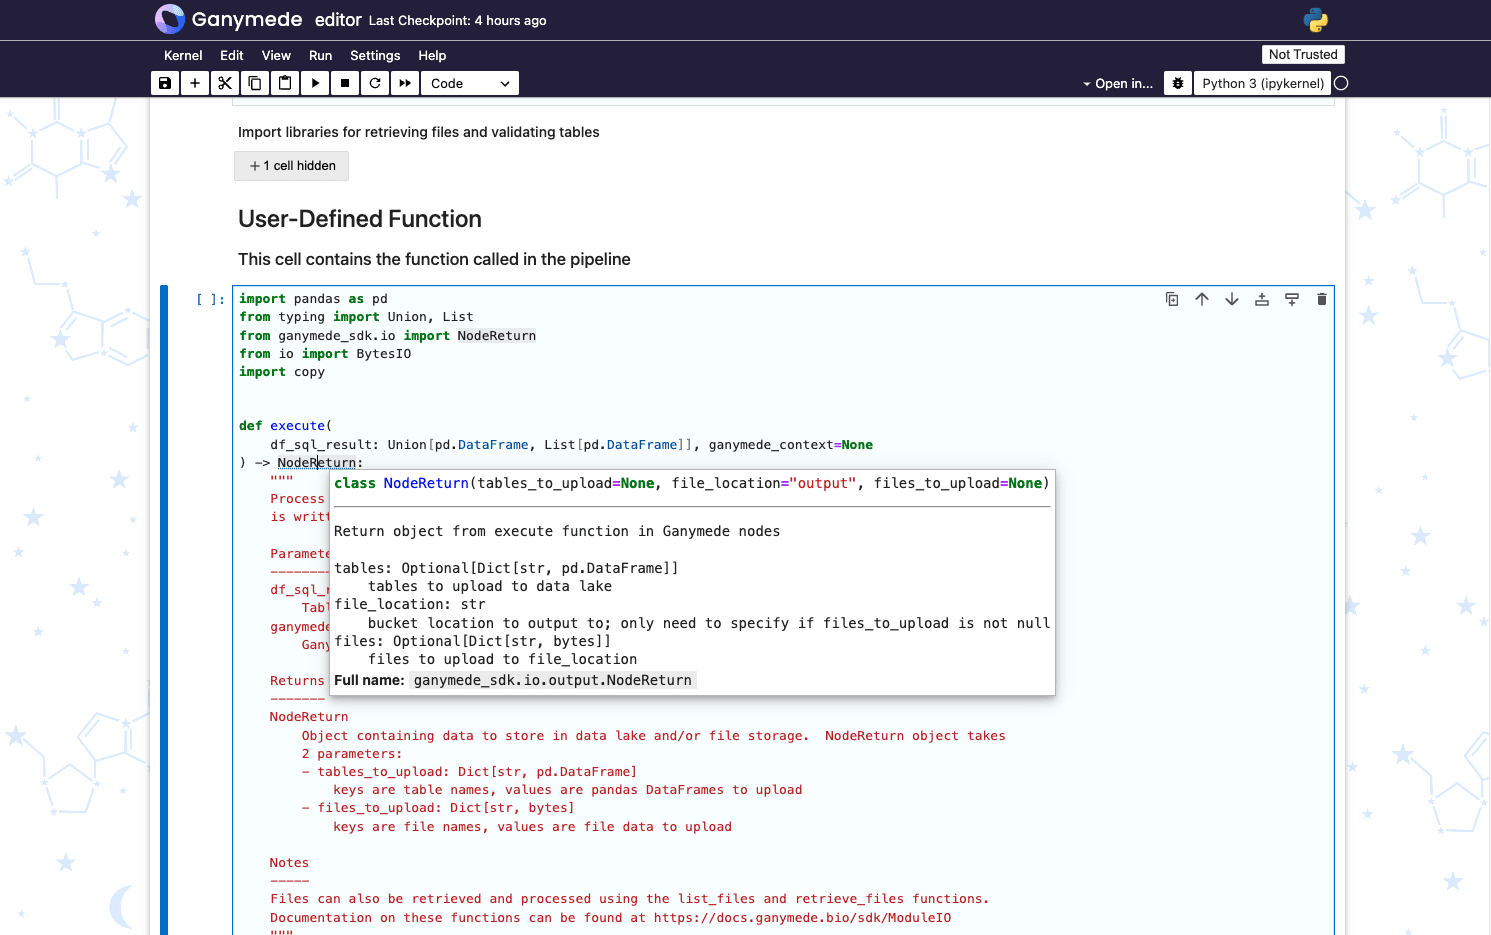
Hover over a class or method and click Ctrl to display a tooltip with the class or method signature:
Pipeline Code Notebook Sections
User-defined SQL
query_sql = """
  SELECT * FROM demo_file;
"""
For nodes that reference the Ganymede data lake on input, the query_sql string is used to specify the data table to process on the input parameter in the execute function. The schema in the query is specific to the tenant used, and the file corresponds to the name used in an upstream node.
Available tables and their associated schemas can be observed in the Data Explorer tab of the Ganymede app.
More than 1 query can be specified as input; to do so, specify multiple queries as semicolon-delimited query strings. These are passed as a parameter to the user-defined Python function as a list of tables.
User-defined Python
import pandas as pd
from typing import Union, List
from io import BytesIO
from ganymede_sdk.io import NodeReturn


def execute(
    df_sql_result: Union[pd.DataFrame, List[pd.DataFrame]], ganymede_context=None
) -> NodeReturn:
    """
    Process tabular data from user-defined SQL query, writing results back to data lake.  Data
    is written to the output bucket.

    Parameters
    ----------
    df_sql_result : Union[pd.DataFrame, List[pd.DataFrame]]
        Table(s) or list of tables retrieved from user-defined SQL query
    ganymede_context : GanymedeContext
        Ganymede context variable, which stores flow run metadata

    Returns
    -------
    NodeReturn
        Object containing data to store in data lake and/or file storage.  NodeReturn object takes
        2 parameters:
        - tables_to_upload: Dict[str, pd.DataFrame]
            keys are table names, values are pandas DataFrames to upload
        - files_to_upload: Dict[str, bytes]
            keys are file names, values are file data to upload

    Notes
    -----
    Files can also be retrieved and processed using the list_files and retrieve_files functions.
    Documentation on these functions can be found at https://docs.ganymede.bio/sdk/ModuleIO
    """

    # Retrieve single table from SQL query into a dictionary
    if isinstance(df_sql_result, pd.DataFrame):
        dict_df_out = {"results": df_sql_result.copy()}
        table_out = df_sql_result
    else:
        dict_df_out = {str(k): df for k, df in enumerate(df_sql_result)}
        table_out = df_sql_result[0]

    # Writes contents of table to CSV file
    bio = BytesIO()
    table_out.to_csv(bio)
    bio.seek(0)
    files_out = {"demo_file": bio.read()}

    # Return object containing data to store in data lake and/or file storage
    # files_to_upload is a dictionary of file names and file data to upload
    # tables_to_upload is a dictionary of table names and pandas DataFrames to upload
    #
    # For more information on the NodeReturn object, type ?NodeReturn or ??NodeReturn in a cell
    return NodeReturn(
        files_to_upload=files_out,
        tables_to_upload=dict_df_out,
    )
In this example, the execute function takes the results of 1 or more tables as input, presented as either a pandas DataFrame or list of pandas DataFrames.
A single table is retrieved from df_sql_result, and the results are written to both the tabular database and as a CSV file to the file storage system.
The names of the query_sql variable and execute function cannot be modified or moved to different cells in a notebook. Upon saving the notebook, the cells that contain the query_sql string and execute function are saved, and the contents of all other cells are discarded.
This allows users to conduct testing in other cells prior to committing and loading code to the workflow orchestrator.
Testing Section
# Example 1: Testing section for Python node
from ganymede_sdk import Ganymede

# Declare Ganymede object, which retrieves Ganymede context object from prior run to enable mimicking the execution environment of the most recent pipeline run
g = Ganymede()

# Retrieve dataframes to process; the context object enables rendering of Jinja template variables used in data retrieval
# More detail can be found on the Flow Context & Metadata page of this documentation, under the Template Variables section
result_dfs = g.retrieve_sql(query_sql)
result_dfs

# Run user-defined python on retrieved data
res = execute(result_dfs, ganymede_context=g.ganymede_context)
res
The testing section enables users to test pipeline code prior to deployment. In the example above, the testing code executes query_sql and sends the result to the execute function.
Nodes that load data use a file upload widget so that a file can be uploaded prior to processing. Running the code below yields a button that allows users to submit a CSV file. Data associated with the code can be accessed by the execute function as shown in the 2nd code snippet below.
# Example 2: Testing section for Input_File node

# Load Jupyter black, and create widget for uploading CSV for testing node operation
from IPython.display import display
import ipywidgets as widgets

import jupyter_black
jupyter_black.load(line_length=100)

# Create file upload widget
file_uploader = widgets.FileUpload(
    multiple=False,
)
display(file_uploader)

# Retrieve context variable from most recent run
from ganymede_sdk import Ganymede
g = Ganymede()

# Assemble file uploaded into dictionary keyed by filename
f = file_uploader.value[0]
input_file = {f.name: f.content.tobytes()}
print("\nInput file: \n" + "\n".join(input_file.keys()))

# Run user-defined Python on uploaded file
res = execute(input_file, ganymede_context=g.ganymede_context)
res
Saving and Deploying Pipeline Code
Saving notebooks can be accomplished in a couple ways:
- Clicking the button in the upper right hand corner of the notebook.
- Typing
Cmd+S(Mac) orCtrl+S(Windows/Linux) to save the pipeline cell(s). - Selecting the Kernel menu and then selecting Save Commit and Deploy
Executing any of these actions will lint the pipeline cell(s), and then commit and deploy the pipeline code to the workflow orchestrator. A pop-up will box will appear for each of these actions; lint errors will be displayed in the initial pop-up, and commit confirmation will be displayed on the second pop-up.
Adding flow inputs
Flows can be configured to accept user inputs at the start of each run by selecting the appropriate node and saving the flow. There are three types of inputs:
- File inputs (e.g. - FileAny, FileCSV, etc.)
- Text (string) inputs (e.g. - string)
- Tag inputs (e.g. - TagBenchling)
A list of available nodes and their associated categories can be found on the table listing of node characteristics More detail can be found on the Node documentation page.