Installing Agent Connections
Starting with version 5.6.0, Ganymede supports the Gateway installation model, which allows you to install a single executable per PC and then add Connections through the Ganymede UI. This is the recommended approach for new installations.
For existing installations, you can still install individual Connection executables as described in the Legacy Installation sections below.
Gateway Installation (Recommended)
The Gateway model simplifies deployment by allowing you to install one executable per Host (PC), then create and manage Connections through the Ganymede UI.
Step 1: Download the Gateway
- Open the Ganymede application in Google Chrome: <tenant>.ganymede.bio
- Navigate to the appropriate environment (e.g., development or production) for your tenant.
- Navigate to the Hosts section of the Connections page by selecting the icon in the left toolbar.
- Click the button.
- Download the Gateway executable for your operating system (Windows or Linux).
Step 2: Install the Gateway
Windows
- Run the downloaded Gateway executable as an administrator.
- Select "yes" when prompted by the User Account Control dialog.
- Follow the installation wizard:
- Specify a descriptive name for the Host (e.g., the PC name or location).
- Choose the installation directory. The default is
C:\Program Files\Ganymede\Gateway\. - Click Install to begin the installation.
- Once complete, ensure the Launch Ganymede Gateway checkbox is checked and click Finish.
Linux
- Make the Gateway executable and run the installer:
# Make the gateway installer executable
chmod 755 gateway_<timestamp>

# Run the installer, replacing with your username and desired host name
HOME=/home/<user>/Ganymede ./gateway_<timestamp> <host name>
- The installer will set up the Gateway as a systemd service and start it automatically.
Step 3: Verify the Host is Online
- Navigate to the Hosts section in the Ganymede UI.
- Find your newly created Host and verify its status shows as "Live".
Step 4: Create Connections on the Host
Once your Host is online, you can create Connections without downloading additional executables:
- Navigate to the Host's detail page in the Ganymede UI.
- Click .
- Select an existing Agent Template or create a new one.
- Configure the Connection settings (name, variables, labels, file tags).
- The Connection will start automatically on the Host.
You can move existing Connections to a different Host by selecting 'Move existing connection' instead of creating a new one. This is useful for migrating Connections or redistributing workload across Hosts.
Legacy Installation
The legacy installation method involves downloading and installing a separate executable for each Connection. This method is still supported for environments where Connections are running at older versions.
To install a Connection using the legacy method, open the Ganymede application in a browser window and navigate to the Connection tab in the left sidebar. Select the desired Agent by name and download the relevant Windows/Linux installation file.
Windows Installation (Legacy)
Step 1: Download the Agent
- Open the Ganymede application in a Google Chrome window: <tenant>.ganymede.bio
- On the top panel, navigate to the appropriate environment (e.g. - development or production, as appropriate) for your tenant (if not already there).
- Navigate to the Connections page by selecting the icon in the left toolbar.
- Select the Agents subsection of the Connections page to view all available Agents.
- Find your Agent and hover over the button.
- Select the Windows EXE option to download the agent in your browser.
- An executable named <your_agent>_<id>.exe should download to the PC
If you would like to download the Windows Agent through a script, you can do so through the Ganymede API.
Step 2: Run the Agent Installer
- Connection name: The name visible to users on the instrument computer and in the Ganymede UI.
- Variables: Strings in the format "var_name=var_value" that allow users to set context variables for use in user-defined Python code.
- Labels: Strings used to identify and group Connections within Ganymede. The label is visible in the Connections UI.
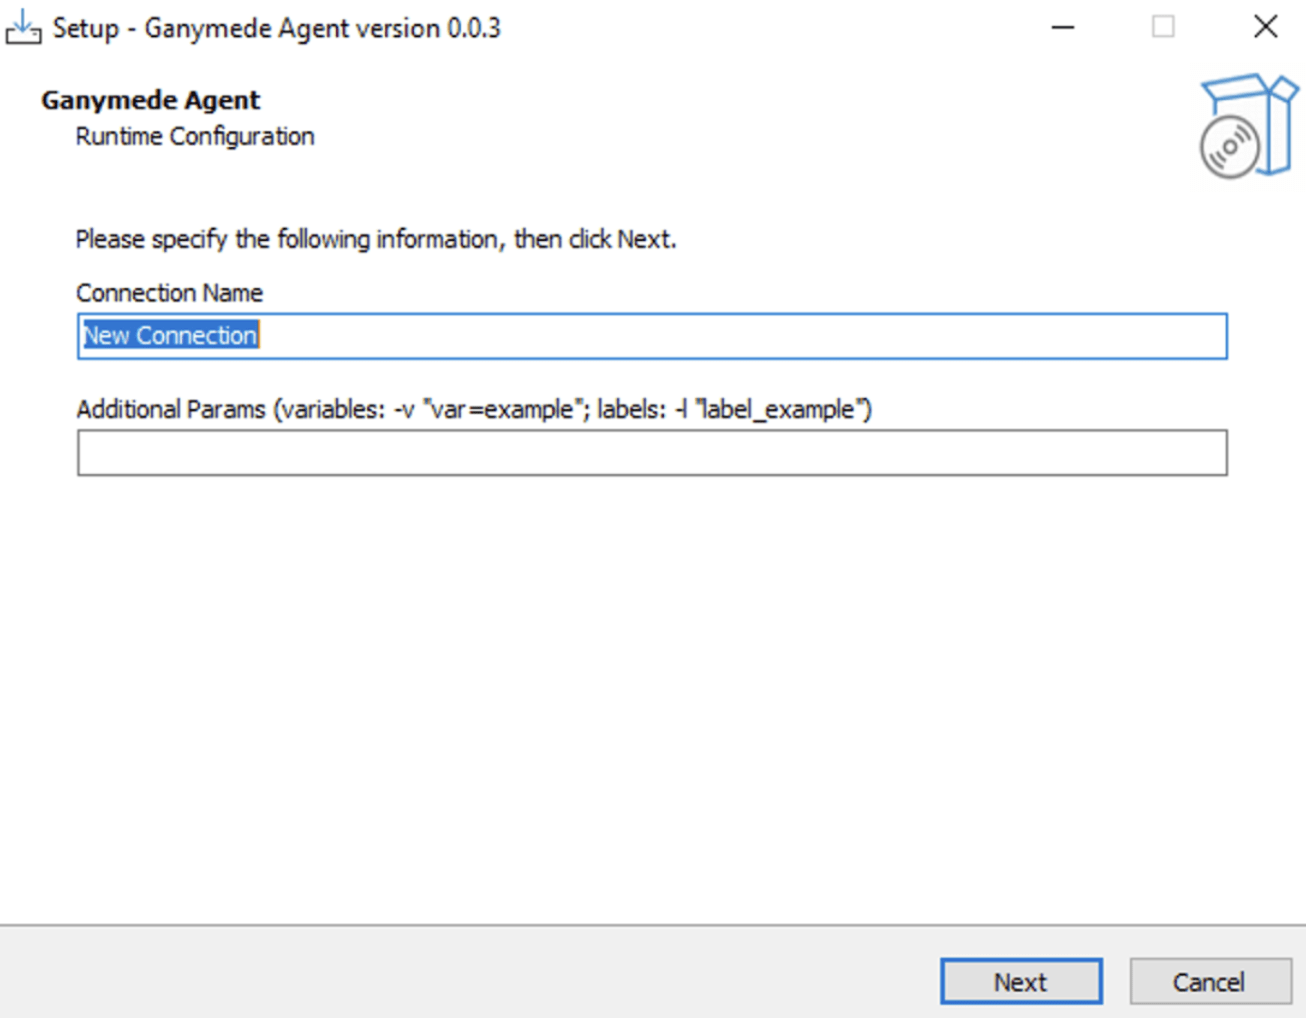
- After downloading the Agent Connection, launch the agent.exe executable on the instrument PC as an administrator.
- Select "yes" when prompted by the User Account Control dialog to allow the Agent application to make changes to your device.
- Navigate through the installation wizard.
- Specify a descriptive name for the Connection.
- A descriptive name might include the instrument name, asset tag, or other identifiers.
- Leave the "additional params" field blank; while variables and labels can be specified here, they can also be modified later in the Ganymede web app.
- Click Next to complete the configuration.
- Specify an installation directory. The default installation directory is
C:\Program Files\Ganymede\<connection-name>\.- If you install multiple Connections on the same PC, it is recommended that you create an additional directory within the Ganymede folder for each Connection.
- Select Next to continue.
- Click Install to begin the installation process.
- Once the installation is complete, a final popup window will appear.
- Ensure the Launch Ganymede Agent checkbox is checked.
- Click Finish to exit the installer and start the Agent service.
- Specify a descriptive name for the Connection.
The Windows Agent installer can be run headlessly if desired.
Step 3: Check the Connection Status
- Navigate to the Connections page in Ganymede.
- Open the Ganymede application in a browser window: <tenant>.ganymede.bio
- On the top panel, navigate to the <tenant>-<tenant-env> environment
- Navigate to the Connections page.
- Find your Connection and click it to open the detailed Connection page.
- On the top of the Connection settings you should see the Status is “Live”
If the Connection is not showing up in Ganymede, or if the status is anything other than Live, please contact Ganymede Support and send the stderr.log that is in the Agent installation directory
Step 4 (if desired): Service Identity Setup
This feature was introduced in Agent version 5.3.20; if you have an earlier version, jump down to the For connections prior to 5.3.20 section.
Add Identity Secrets to Ganymede
- Click your username in the top-right corner of the Ganymede UI
- Click Environment Settings
- Select the Secrets tab
- Click “Add Secret” and add enter in the username for your Windows service identity. Note the name of the secret, since you will reference this name when you configure the service identity credential for a Connection.
- Repeat step 4 for your password.
The domain must be included as part of the username. If the username is created local as described in “Setting Up Local Account” then “.\” should be prepended to the username to indicate it is a local account.
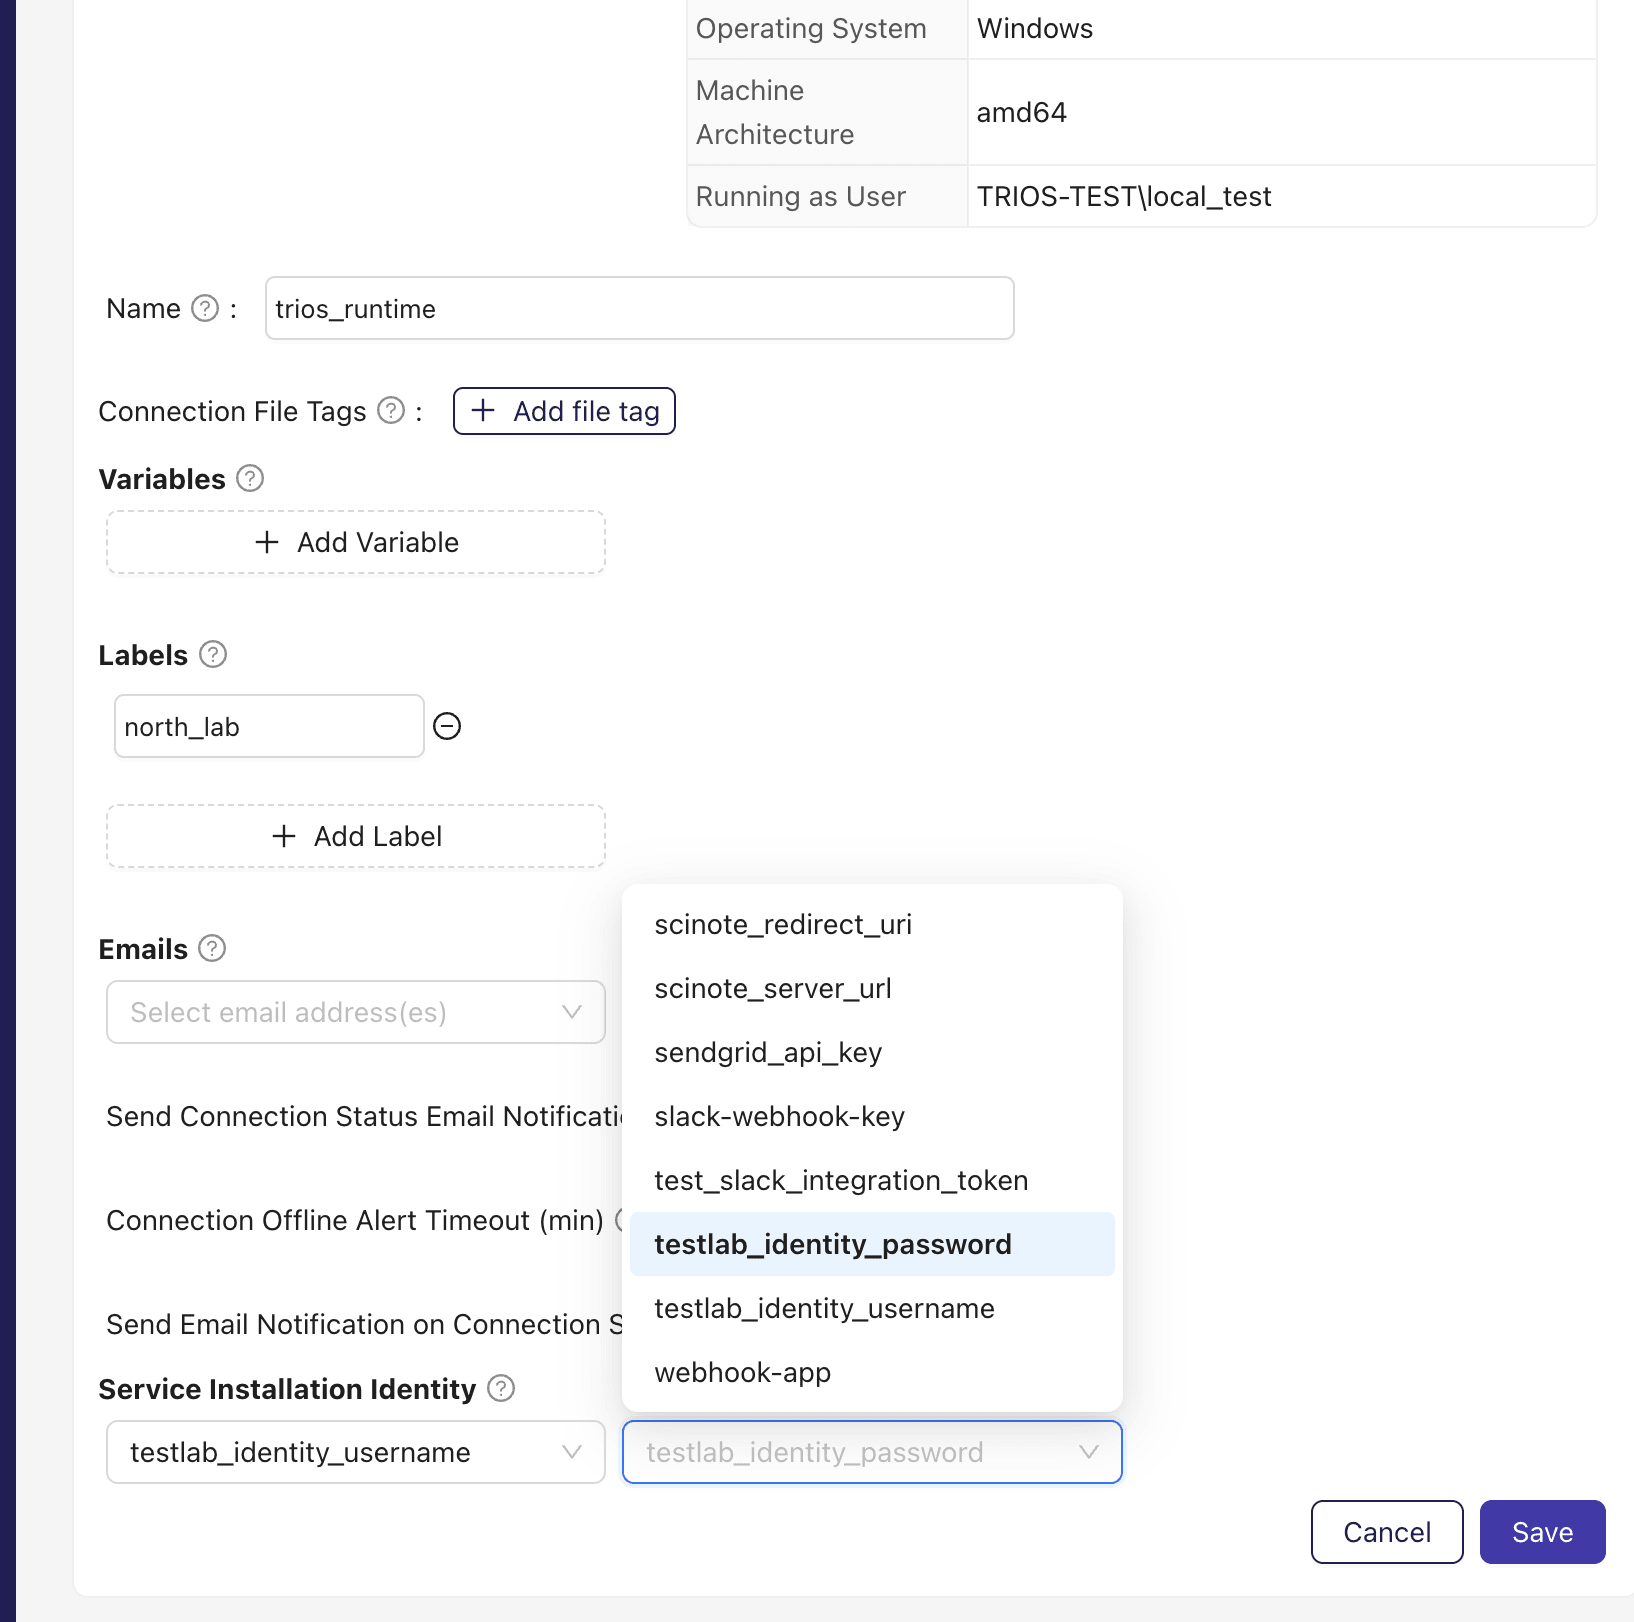
Attach an Identity to a Connection
- Install a connection and ensure it is running successfully
- Verify the connection appears in the UI healthy
- On the connection's page, the Service Installation Identity section includes the form for the username and password
- Click Edit Connection
- Select the username and password secrets
- Save the Connection
- A log should appear within a few seconds that says “Auth full-update with current exe”
- The services window should show the connection running as the designated user
Any changes to the secret values will propagate to the connection and force the service to restart with that information.
For connections prior to 5.3.20
- Open Windows Service Manager. To do so, press Windows + R, type
services.msc, and hit Enter. - Find the Ganymede Agent service in the list of services.
- The service name will be in the format
GanymedeAgent-[agent uuid]. - The Connection ID can be identified by navigating to the Connections pane and selecting the newly created Connection.
- Right click the Agent service and select Stop.
- Right click the service again and select properties to open the properties menu.
- Navigate to the logon section and select the radio button next to “This account:”
- Fill in the username and password fields with credentials that allow access to the network drive
- Close the properties menu and start the service by right clicking and selecting “Start”.
- Navigate back to the Connections pane in Ganymede to confirm the connection is active and running
There may be a slight delay as the service connection resumes.
Linux Installation (Legacy)
Step 1: Download the Agent Installer
- Open the Ganymede application in a Google Chrome window: <tenant>.ganymede.bio
- On the top panel, navigate to the appropriate environment (e.g. - development or production, as appropriate) for your tenant (if not already there).
- Navigate to the Connections page by selecting the icon in the left toolbar.
- Select the Agents subsection of the Connections page to view all available Agents.
- Find your Agent and hover over the button.
- Select the Linux option to download the agent in your browser.
- A binary named <your_agent>_<id> should download to the PC
If you would like to download the Linux Agent installer through a script, you can do so through the Ganymede API.
Step 2: Run the Agent Installer / launch the Agent
After downloading the agent installer, modify permissions for the installer to 755 and run the installer, which registers the Agent service with systemd and starts the service.
# make the agent installer executable
chmod 755 agent_name_<timestamp>_agent

# run the agent installer, replacing the user name with your user name (viewable using the whoami command) and the desired connection name.
# The connection name is something you choose, and represents how the connection will be visible in the Ganymede UI.
#
# Ex: if timestamp is 20000101-1234567890 and desired connection name is "test-connection":
# HOME=/home/username/Ganymede ./agent_name_2025-1234567890_agent test-connection
#
HOME=/home/\<user\>/Ganymede ./agent_name_<timestamp>_agent \<connection name\>
This Agent installer will install the Agent in /home/<user>/Ganymede/<connection name> and launch the systemd service for the Agent.
Step 3: Check the Connection Status / Configure the Connection
-
Navigate to the Connections page in Ganymede.
- Open the Ganymede application in a browser window: <tenant>.ganymede.bio
- On the top panel, navigate to the <tenant>-<tenant-env> environment
- Navigate to the Connections page.
- Find your Connection and click it to open the detailed Connection page.
- On the top of the Connection settings you should see the Status is “Live”
-
Configure any desired file tags and variables for the Connection in the Ganymede UI, as described in the Post-Installation Activities section.
If the Connection is not showing up in Ganymede, or if the status is anything other than Live, please contact Ganymede Support and send log and yaml files that are in the Agent installation directory.
Prior to v5.5.63, the Linux Agent service is not set to start on boot. Enable start on boot by running the following command after the Connection has been installed:
sudo systemctl enable <service name\>.service
Additional useful commands
Additional commands that can be useful for debugging and configuring the Connection service are listed below. These commands should be run from the terminal on the instrument computer.
# view the name of the systemd service
cat /home/\<user\>/Ganymede/\<connection name\>/connection.yaml | grep service_display_name

# observe the status of the Connection service
systemctl status \<service name\>.service

# Reload the systemd service file after changes have been made to a service file
# and restart the Connection service after changes have been made
sudo systemctl daemon-reload
sudo systemctl restart \<service name\>.service

# view the logs for the Connection service
journalctl -u \<service name\>.service
Systemd service background info
The service file for the Connection is located at /etc/systemd/system/<service name>.service. The service file is created by the Agent installer and can be modified as needed.
Below is a description of the fields in the systemd service file; more information can be found in the systemd documentation.
[Unit]
Description=Ganymede Example Agent
After=network.target
Wants=network.target
StartLimitIntervalSec=0

[Service]
Type=simple
Restart=on-failure
RestartSec=10
TimeoutSec=30
User=jane_doe
ExecStart=/path/to/agent/executable
StandardOutput=append:/var/log/ganymede/GanymedeExampleAgentService.log
StandardError=append:/var/log/ganymede/GanymedeExampleAgentService_err.log

[Install]
WantedBy=multi-user.target
- Description: Identifies the Connection in logs.
- After and Wants: Ensures that basic networking has been set up before launching the Connection.
- StartLimitIntervalSec: set to 0 to avoid service from stopping; by default, the service would stop after a certain number of failures within a specific timeframe.
- Restart: Set to restart the Connection on unclean exit code or abnormal exit; does not restart on clean exit.
- User: The user to associate with Agent runs. To see the current user, run
whoami. - ExecStart: The path to the Agent executable. The executable takes the following command-line arguments:
- -n / --name: The required field for the Connection name used to identify the device and its data, logs, and status throughout Ganymede.
- -v / --var: a string in the format "var_name=var_value" that allows setting user context variables accessible from user-defined agent code. Multiple variables can be specified as shown in the append configuration setting in argparse. This argument specifies the folder to watch; if not specified, the folder watched will be the directory containing the Connection binary.
- StandardOutput: log file for Connection output.
- StandardError: log file for Connection errors.
- WantedBy: Specifies that, if the service has been enabled, it should start when multi-user.target is reached during boot. This occurs when the system is operational and ready for multiple users to log in and use the system in non-graphical mode.
Post-Installation Activities
Set up Connection Tags and Variables
- Navigate to the Connections pane in the Ganymede app by selecting the icon in the left toolbar and selecting the Connections pane.
- Find the Connection you just created. Click the button at the bottom right of the Connection Settings
- Click to open the file tag popup.
- Select the appropriate Tag Type Name from the dropdown
- Add a Display Value which will appear next to each file uploaded to Ganymede via this Connection
- Optionally, specify a Tag ID to associate with the tag. This is generally only used in situations where a non-human interpretable values to identify the tag programmatically
- Click Add Tag to apply the tag to the connection
- The tag will be visible under connection file tags if properly applied.
- Repeat step 3 for each Tag to be applied to files from this specific Connection.
- Scroll down to the Labels section of the Connection Settings.
- Add Labels to the Connection with desired values, which are strings to associate with the Connection.